What is Swagger
Using swagger we can describe our REST APIs without much effort. We just need to do some minimal configuration and it provides a complete UI which describes all our endpoints along with interface to execute them using web browser without any additional plugin. Also it is customisable so we can add descriptions and other orchestration to our APIs.
Why Swagger
When we have a REST API and we want to share it with our users, we need to provide them all the documentation and specification for our APIs which requires some effort to prepare them. With the help of Swagger UI we can share the Swagger URL for our service where users not only see all the listed operations but they can play also with those APIs using web browser.Implementing Swagger in Spring boot application
Now we will see how to use Swagger in our spring boot application.Maven dependencies
Below dependencies are required for Swagger. "sringfor-swagger-ui" is required if you want Swagger to create UI for you. If you want to create your own UI then you can ignore dependencies for swagger-ui but you need springfox-swagger2 which creates REST based documentation for your API. <dependency>
<groupId>io.springfox</groupId>
<artifactId>springfox-swagger2</artifactId>
<version>2.6.1</version>
<scope>compile</scope>
</dependency>
<dependency>
<groupId>io.springfox</groupId>
<artifactId>springfox-swagger-ui</artifactId>
<version>2.6.1</version>
<scope>compile</scope>
</dependency>
Swagger configuration
Now we need to create the configuration to enable the Swagger. Only this configuration can be enough if we don't want to customise the Swagger and let Swagger create the default documentation for our APIs.
@Configuration
@EnableSwagger2
public class SwaggerConfig {
    @Bean
    public Docket productApi() {
        return new Docket(DocumentationType.SWAGGER_2)
                .select().apis(RequestHandlerSelectors.basePackage("com.myorg.demo.rest"))
                .paths(p->p.startsWith("/"))
                .build()
                .apiInfo(new ApiInfo(
                        "Web scrapper API",
                        "Web Scrapper service for news articles",
                        "1.0",
                        "http://localhost:8081/termsOfService.html",
                        new Contact("Demo user", "http://localhost:8081/about", "demo@myorg.com"),
                       "Service license 1.0",
                        "https://localhost:8081/license1.0.html"));
    }
}
That's it. Now you can run the application and hit the given URLs in web browser.
This URL shows your API documentation generated by Swagger in JSON format as given below.
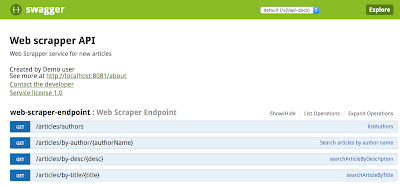
Open this URL in web browser and click "Show/Hide" link. You will see the similar screen as given below.
We can add the details to entities or domain objects also which are used in REST endpoints, like in below code we have added some meaningful description to domain model.
This concludes the implementation of Swagger but Swagger is not limited to this only. We can do a more valuable things with it, like client code generation, test automation etc.
Open this URL in web browser and click "Show/Hide" link. You will see the similar screen as given below.
Customizing Swagger
We can customise the swagger documentation using annotations to add more details description. For example, below code adding operations description and response types in REST endpoint.@ApiOperation(value = "Search articles by author name")
@ApiResponses(value = {
@ApiResponse(code = 200, message = "Success response"),
@ApiResponse(code = 401, message = "Resource not authorized"),
@ApiResponse(code = 403, message = "Access forbidden"),
@ApiResponse(code = 404, message = "Resource not found")
}
)
@RequestMapping(value="/by-author/{authorName}", method = RequestMethod.GET, produces = "application/json")
public List<Article> searchArticlesByAuthor(@PathVariable("authorName") String authorName) {
See the below screenshot after adding above annotations.We can add the details to entities or domain objects also which are used in REST endpoints, like in below code we have added some meaningful description to domain model.
@ApiModel(value="Article", description="News article")
public class Article implements Serializable{
    private static final long serialVersionUID = 1L;

    @ApiModelProperty("Title for article")
    private String title;

    @ApiModelProperty("Article description")
    private String description;

    @ApiModelProperty("Author name")
    private String authorName;
See below screenshot which reflects the changes related to domain object.This concludes the implementation of Swagger but Swagger is not limited to this only. We can do a more valuable things with it, like client code generation, test automation etc.


765A0103C0
ReplyDeleteTakipçi Satın Al
M3u Listesi
Google Konum Ekleme
Dragon City Elmas Kodu
Total Football Hediye Kodu